
You are currently browsing the category archive for the ‘recipe レシピ’ category.
 Happy 1st Birthday, Remi! We absolutely adore you.
A few days after her actual birthday, we had a party. This small party was not only a special occasion for the special girl, but also for Roy and I, as first-time parents, we survived the first year !
My mom was visiting from Japan and Roy’s NY family and our friends joined us to celebrate. It was a wonderful day! Thank you to everyone who came. We feel so lucky to have many special people in our lives.
Remi’s 1st birthday cake was banana cake (I made 1 for her actual birthday & 1 for the party). I’ve been trying several no-sugar or low-sugar cakes recently, and this was the popular one with my people. Remi likes banana, as most of babies out there, and yogurt cream was just her regular food, so this was a successful choice for this special day.
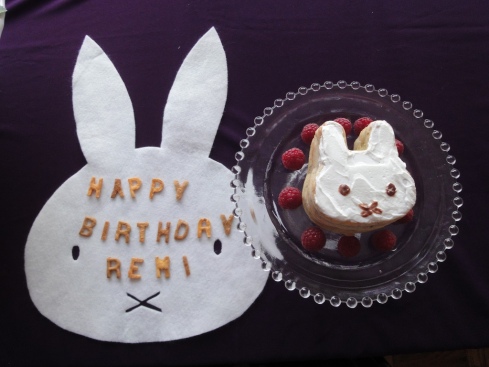
1 year old’s Banana Cake (with no sugar!)
–Ingredients–
* 3 banana (about 120g/each)
* 100g butter (unsalted)
* 2 eggs (large)
* 200g flour
* 2tsp baking powder
* 1/2 lemon (juiced)
* a pinch of vanilla essence
*Greek yogurt, optional, for the decoration
- Generously butter pan and dust with flour, knocking out excess flour.
- Preheat the oven to 350F.
- Set a baking pan or mold with parchment paper.
- Sift together sifted flour and baking powder into a bowl.
- Mash bananas with folk and mix with lemon juice.
- Melt the butter and beat in a large bowl ( an electric mixer is faster but not necessary) until pale and fluffy.
- Add eggs 1 at a time, beating well after each addition, then beat in vanilla.
- Add banana and mix well.
- Add flour and lightly mix with spatula.
- Bake for 30~ 40 minutes, until the top is golden brown.
++++++++
I’d love to share a few more photos of her first birthday party….
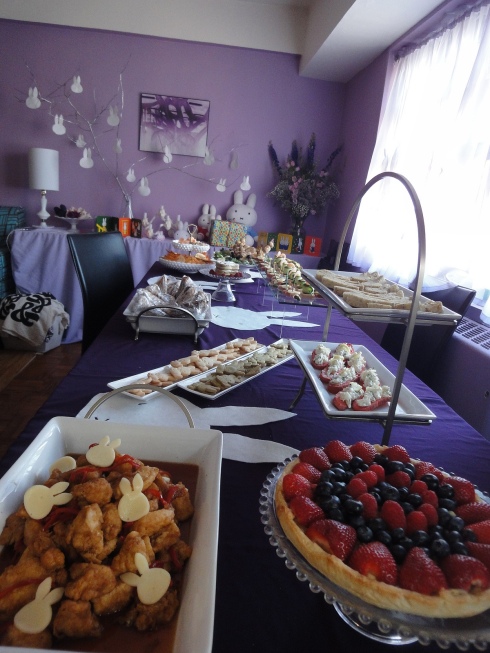 The theme was … Miffy (again)!
 The first “walking” elephant.
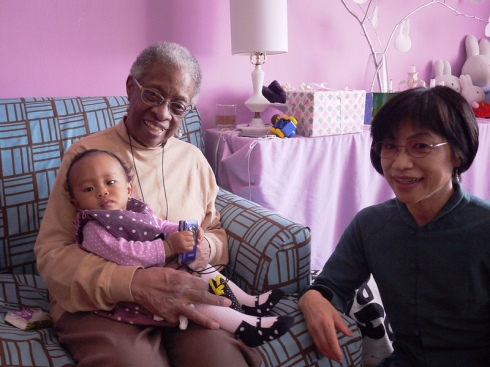 Grandma and Nana.
 Friends who support us.
 The birthday girl in her dream….
 I can’t believe this has been a year!
レミの1才の誕生日から数日後、小さなパーティー(12人)を開きました。日本から駆けつけてくれた私の母、とロイのNYの家族、そして日頃お世話になっている友人数人が一緒にお祝いしてくれました。
去年のベイビーシャワーに引き続き、テーマはミッフィーの第2弾です。この1年、レミの周りはすっかりミッフィーづくしなので(私の日本の家族に感謝です)違和感のないテーマでした。
数ヶ月前から1才のケーキはお砂糖を入れないものを手作りしようと果物や野菜で試行錯誤していたのですが、結果このバナナケーキに落ち着きました。やはりバナナがダントツに甘いので、私の周りでは大人が食べる普通のデザートとしてはこれが評判良かったです。デコレーション・クリームにはいつも食べているグリークヨーグルトをそのまま使いました。レミはケーキも既に試食していたので、とりたてて目新しさはなかったようで、普通に食べていました。手づかみも今の所好きではないので、”手づかみでケーキに貪りつく1才”の写真は残念ながら取れませんでした。
ともかく、記念すべき1才の誕生パーティーは、(親も娘も)皆に沢山遊んでもらって、とてもいい日になりました。


Easter was a week ago. We were invited to Roy’s family’s house for the Easter Brunch. Roy’s Aunt & Uncle did all the cooking, so all we needed to bring were our baby bunny, and the Carrot Cake. Lately, I’ve been testing different kinds of baking goodies with vegetables, with no sugar or less sugar, so Remi can eat when she is ready. Roy has been complaining about the lack of sweetness he expect from cake. But this one is pretty nice for grown ups.

Available @ my shop
– Carrot Cake – (8″ x 8″)
- 200 g Carrots, finely grated 人参
- 200g Unsalted Butter, softened バター
- 200g Flour 薄力粉
- 120g Sugar 砂糖
- 5g Baking Powder ベーキングパウダー
- 4 Eggs, lightly beaten 卵
- 2 tsp Cinnamon Powder シナモンパウダー
- (Lemon peel, optional / レモンピール、お好みで)
– Frosting –
- 100〜150g Cream cheese, softened クリームチーズ
- 30g Powder Sugar 粉砂糖
- 1 tsp Lemon Juice レモン汁
1. Preheat the oven to 360F.
2. Set a baking pan or mold with parchment paper.
3. Whisk together flour and baking powder.
4. Melt the butter and add to sugar in a bowl,
5. Add beaten eggs gradually.
6. Mix well with all remaining ingredients and lightly mix with spatula.
7. Pour batter into pans. Set on the middle rack of oven and bake for 45 minutes, until the top is golden brown. Remove pan from oven, and let stand until completely cool.
To prepare frosting, cream together the cream cheese and the confectioners sugar and beat until mixture is free of lumps. Stir in lemon juice.

先週はイースター・サンデーでした。今年はロイのおじさんとおばさんの家に招待され、イースター・バニーに扮したレミとキャロットケーキを抱えて遊びに行きました。今後のレミのために、最近色々な野菜を入れたお菓子を試験中です。砂糖を入れないものや、少量の物ばかりなのでロイにはぶーぶー言われていますが、これはちゃんとお砂糖入りです。私のイメージしたキャロットケーキが白いフロスティング付きなのと、ミッフィーにしたかったのとで、クリームチーズのフロスティングにしてみました。

 Ever since we bought a bread maker, we’ve been making pizza often. Our machine makes pretty tasty dough in 45 minutes. (If you’re interested its this one from Panasonic.)
Cheese and tomatoes are not Roy’s favorite things, so the standard pizza with marinara sauce wouldn’t be the first thing he would ever ask for. We only go to pizza restaurants serving pesto-based pizza. The nice thing about home-made pizza is you can use all your favorite toppings and adjust the sauces and cheese. We’ve been making pesto-based pizza with less cheese (for Roy, and add fresh mozzarella for me!) and garnish with big arugula.
The other day, I rolled out the dough for a pizza and realized that we were out of the pesto base. As a substitute I used Yuzu-kosho paste with mayonnaise for the base. Then we loved it and its beginning to be our new standard sauce for pizza. Yuzu kosho is a Japanese seasoning paste made from chili peppers, yuzu peel and salt. I mix mayonnaise with it and spread it over the pizza dough before putting on the toppings & cheese.
I wonder what we’ll start liking when we run out of yuzu kosho someday.
.
うちでは何年か前にパン焼き機を買って以来、ピザをよく作ります。材料を入れて45分でなかなか美味しい生地が出来ます。
ロイはもともとチーズもトマトも好きではないので、スタンダードなマリナラソースのピザが苦手です。行きつけのピザ屋さんはバジルのペストベースで作ってくれる所なので、そのまねをして自分たちで作るピザもペストベースでチーズは少なめ、牛肉やお魚等好きな物をのせ、焼き上がった物にサラダを載せて食べます。
ある時、使おうと思っていたペストが見つからず柚子胡椒とマヨネーズで凌いだ所、これが大当たりでした。それからすっかりベースはこれで、と定番に成りつつあります。
作り方(という程でもないですが)はこちらです。
柚子胡椒が切れたらまた新しい定番が出来るかもしれません。

 Orange mousse cake for my friend’s birthday.
It’s getting closer to Spring, and time to update some posts (its about time!).
Our friend Michelle come over to our place last week, and we celebrated her birthday. I have orange fever around this time of the season, and Michelle has orange colored hair, so….I wanted to use orange in her birthday cake. I drew her face with a 2 layered orange mousse cake.
One thing I learned is that gelatin made of orange juice comes out as yellow gelatin. Not orange, as anticipated.
.
友達のミシェルが誕生日とのことで、夕食に招待しました。
季節柄オレンジが気になるのと、彼女の髪の毛がオレンジ色なので、バースデーケーキはオレンジを使う事を即決、ケーキにのせたオレンジの2層ムース で似顔絵を描きました。作ってみたらオレンジのゼリーはオレンジ色というより黄色く出来る事が判明しましたが、何となく彼女の感じには近づけたかと思います。(どうでしょう?)
作り方はこちらです。
 Happy Birthday!
 Shredded burdock and carrot salad seasoned with pepper & yuzu citrus in wonton
–Ingredients–
Makes 20 cups in mini-muffin mold
20 wonton sheets
1/2 lbs gobo (burdock root)
1/4 lbs carrot1 avocado
1 tbsp mayonase
1 tsp black pepper
1 1/2 tbsp yuzu (or lemon)
1 tsp salt
2 tsps vegetable oil
1 1/2 tbsp yuzu (or lemon)
1 tsp salt
2 tsps vegetable oil
–Preparations–
- Preheat the oven to 350F degrees . Spray mini-muffin mold with cooking spray (if it is not made of silicon).
- Brush the wonton square with oil, placing each sheet into a section of the mini-muffin mold. Gently press into the mold and arrange so that it forms a cup shape. Sprinkle with salt and bake for 10~12 minutes, until browned and crisp. Remove from the mold and allow cups to cool.
- Wash the burdock and scrape off outside skin with the back of knife. Shred with slicer or cut into 1/4″ ~1/2″ matchstick-size strips, placing them to soak in water-vinegar solution as you cut, to prevent discoloration.
- Wash, peel and cut carrots into 1/4″~1/2″ matchstick-size strips, about the same size as burdock.
- Heat vegetable oil in a frying pan, and stir-fry gobo (burdock) strips for a couple minutes.
- Add carrot strips to burdock. Season with salt & pepper. Continue to stir-fry until soft. Turn off heat and allow mixture to cool in a bowl.
- Wash & tear lettuce.
- Mix yuzu (or lemon) with mayonnaise in bowl, adding stir-fried
- burdock & carrots and diced avocado to create a salad.
- Arrange lettuce in wonton cups, and fill each cup with the salad and serve.
*
ワンタンの皮の表面にオイルを薄く塗りノンスティック(またはオイルを軽く塗った)小さめのマフィン型に少しひだを付けカップの形に整えながら入れます。180℃のオーブンで10〜12分きれいな色がつく迄焼きます。オーブンから出し型からはずして冷ましておきます。
今回はゴボウのサラダ(ゴボウ、人参、レタス、アボカド)を入れました。ソースはゆずとマヨネーズです。皮がカリカリなので具+ソース等ですこし湿り気がある方が食べやすいかと思います。
日本語のレシピはこちらです。

Thanksgiving is a holiday that is only recently familiar to me. This year Roy and I hosted our first Thanksgiving in our new Brooklyn apartment, where we moved in a few month ago.
Since this was my first experience at curating the Thanksgiving meal, I was happy to have somewhat free reign over the planning of the holiday menu. I could plan without too many preconceptions or expectations. Our aunt Donna brought roast turkey, gravy and stuffing to create perfect Thanksgiving foundation, so I wanted to serve non-traditional, slightly elegant side dishes.
We had several issues on a night before. Roy arrived home slightly inebriated, after celebrating the retirement of a friend from school. He came home in good spirits, but he was useless that evening as far as suggesting what to do with the overcooked sweet potatoes. He woke up early the next morning to attend to his responsibilities, and I ended up using them in dumplings. They made an excellent appetizer. Only my mom knew that it was supposed to be a Japanese style sauteed dish.
Our complete menu:
Appetizers
Tomato, Olive & Trout Savory Cake
Parsley & Bacon Savory Cake
Edamame Cubes
Sweet Potato Dumpling
Side Dishes
Green Bean Shira-ae with Sesame Sauce
Pesto Mashed Potato Casserole with Beef
Daikon & Mizuna Salad with Yuzu & Pepper Dressing
Kielbasa(Polish Sausage from Donna)
Stuffing by Donna
West Indian Rice & Peas, by Rhonda, Roy’s sister
Main Course
Roast Turkey with Gravy by Donna
Dessert
Pumpkin Cream Cheese Tart
Apple Clafoutis
Holiday Cookies
The edamame cubes were the most un-Thanksgiving food I had. My mom makes very nice ones, so I decided to offer them as an appetizer. I knew it could be too new for some people here, especially for this day. But it they were eaten quickly!
–Ingredients–
* 200g(+/-) edamame
* 400ml soy milk
* 80g sugar
* 5g poweder kanten (agar)
* pinch of salt
*water to boil edamame
–Preparations–
1. Boil edamame beans in water with bit of salt. Remove individual beans from the pods, and remove the skins out of each bean. (See how to cook edamame, or you can use frozen soybeans which are already cooked)
2. Mix beans and soy milk in a blender until it forms a thick paste.
3. In a pot, add sugar and kanten to the paste. Bring to a boil and cook over medium heat until kanten is melted.
4. Pour into deep mold of your choice and let it cool in a refrigerator.
I had a clear plan for the very easy table decorations. Unfortunately my red maple leaves wrinkled up in the shopping bag. When I started to iron some cut leaves right in the middle of our finishing up time, Roy come by and he looked like he wanted to say something. I told him, “You married me! Deal with it.” He decided to take pictures instead of saying anything, and we didn’t talk about it until we finished the preparations. We both agreed that the table looked excellent.
This holiday meant a lot to both Roy & I since we had a fantastic time with lovely people. ¡Gracias mi famila!

感謝祭は無事に終了〜!
それなりに不安のあった私のメニューも思ったより好評をいただき、ほっとした一夜でした。前菜はともかく着席する頃には叔母の持って来てくれたローストターキー、グレイビーソース、スタッフィングの存在感のおかげでどう見ても感謝祭風のテーブルになり、ニューヨーカーの家族もテキサスからの親戚も満足してくれた様です。
唯一、大量のオレンジ色のカリフラワー&ブロッコリーは出すのを忘れたのが心残りです。(カリフラワーのスープを作り、二日後のパーティーで出そう,と思ったらそっちでも忘れました。)
料理はパーティーとしては今回めずらしく一人きりの作業でした。いつもの友人は出張でNYに居ない上に、ロイは買い物と部屋の整理で手一杯、しかも前夜は仲良しの用務員さんの送別会とやらで酔っぱらわされて戻って来るというハプニングまであり、私は掃除の終わっていない部屋でボーゼンとしました。それでも次の日早起きしたようで、私が起きた時には掃除と整理もほとんど終わっていました。うちではバスルームと床掃除は男の仕事,と言う事にしてもらっています。(それは私がやりたくないからです。。。。)
担当の前菜と副菜はとにかく季節の新鮮なもので好きなものを作ったのですが、近所のグリーンマーケットでは水菜が売られており、珍しいのと嬉しいのとで巨大な束を2つも買ってしまいました。これは大根と一緒にサラダになりました。
さつまいもは、普通に煮たり茹でたりしたくなかったので悩んだのですが、慌てて電話で母に聞いたごま風味のきんぴらにしてみました。しかし火が通り過ぎてしまい失敗!。。。。夜中の1時過ぎ、急遽ワンタンの皮で包むことにしました。味つけは良かったので包み揚げにしたところ、つまみやすい前菜になりました。
感謝祭らしくないモノの代表だったのが枝豆の寒天(わかりやすいように豆腐と呼んだりもします)でしょうか。母の作るものが美味しいので作ってみたのですが、アメリカ人がこの日に食べるにはちょっと新しすぎるかなあ,と不安でした。が、枝豆好きな人が多く,瞬く間になくなり嬉しかったです。
枝豆寒天、作り方はこちら
ただ、パンプキンにクリームチーズケーキがはいったタルトは、よくあるシナモン風味の極甘パンプキンパイを期待して食べた方々にはちょっと残念だったのかもしれません。私はこのほうが軽めで好きなんですけど。
パンプキンモンスターケーキ、作り方はこちら
ちなみにハロウィーンに大量に作ったものはこれでした。
リビングを占領した長いテーブルのセッティングは、真っ赤なカエデの葉っぱを華やかに飾ろうと、沢山買っておいたのですが,しまってある間にくしゃくしゃになってしまい使用不可能でした。結局、少数を切り取ってちりばめたのですが、一枚ずつアイロンをかけました。緊迫した時間の中、こっそり作業中の私を見て驚いていたロイでしたが、結果的に準備は余裕を持って整ったので葉っぱはキレイで必要だった、ということで終わりました。


Clafouti, also known as clafoutis, is one of the easiest desserts to fix. It’s French in origin, usually made with cherries, but It also work well with other fruits, such as apple, pear, and any berries….
This might be the only baked sweet I’ve been keep making since when I was a kid, and the combination of pear & almond one has been my favorite these days.
The word Clafouti/ Clafoutis is really that familiar with Americans. They often mistake it for flan with fruits. But I am proud to promote the dessert with the accent on “fou” as the French do, even if they laugh at me!
–Ingredients–
* Fruits / 300g strawberry (or 3 pears for Pear Clafouti)
* 200ml milk
* 100ml heavy cream
* 50g butter (unsalted)
* 3 eggs
* 40g flour
* 1 lemon (juiced)
* a pinch of vanilla essence
* half cup of sliced almond
* For the base, you can either use a 10″ pie crust, tart base, Graham cracker crust or no base at all.
1. Preheat the oven to 350F.
2. If you are not using a crust, set a baking pan or mold with parchment paper.
3. Roast the sliced almonds in a frying pan on high heat, shaking constantly.
4. Cut the fruits: (strawberries- cut in half or keep whole if they are small. Pears- peeled & sliced)
5. Melt the butter and add to sugar in a bowl, then mix well with all remaining ingredients except flour.
6. Add flour and lightly mix with spatula.
7. Arrange the fruits in a spherical pattern on he bottom of the base, then pour in mixture to fill the base. Sprinkle with sliced almond.
8. Bake for 30~ 40 minutes, until the top is golden brown. Serve at room temperature, or chilled.

急な来客があったのでクラフティを作りました。
これはお菓子の中で唯一子供の頃から作っているものです。つまりとっても簡単な焼き菓子なのですが色々試した結果この生地に洋梨とアーモンド、というのが最近の定番です。
材料も揃っているし、混ぜて焼くだけ、と思いきや、お客人のひとりは美味しそうな洋梨を持参してくれて、もうひとりには前回もこれを出した事に気付き、急遽苺に変更しました。苺はよく行く八百屋さんで閉店寸前におまけでもらった熟れきった苺で丁度良かったです。
”クラフティ”というのは周りのアメリカ人には全く馴染みがないらしく、ああ、果物入りのフラン(焼きプリン)?。。。等とあっさり言われますが、フレンチ風に”フ”を強調して(フランス語圏の友人の受け売り)クラフティと言っては失笑を買っています。
作り方はこちら。

Sangria, Yellowfin tuna topped with cucumber sauce, and Gougère
A Gougère is a savory choux pastry, traditionally made with gruyere cheese.
I thought of adding some savory flavor to the choux pastry to pair with wine. I also thought about trying materials like bacon, prochiutto, cheese, sesame, to create a new twist on the tradition. But I didn’t know that there is the French appetizer called Gougère. There is a lot I have to learn about baking.
Flavor Palette‘s baker, Isabel did a new trial chocolate & raspberry cake, with Swiss chocolate that she brought near Bern. It was my birthday and we haven’t had small gathering that wasn’t a job for while, so It was nice for both of us to try some new flavors!
.

Gougère
–Ingredients–
- 90ml Water
- 90ml Milk
- 90g Butter(unsalted)
- 3 Eggs
- 100g Flour
- 80g Gruyère cheese( or other hard cheese) finely grated
- 3~4 pieces Bacon (cooked & cut in small pieces)
- 1 Egg yolk (for glazing)
- a pinch of Black pepper
- a pinch of Nutmeg
1. Preheat the oven to 375F. Set a baking pan with parchment paper. Break and lightly beat eggs.
2. Heat the water, milk, butter and spices in a saucepan over medium-high heat. Reduce heat to low after everything is mixed and boiled.
3. Pour the flour and stir with spatula until the mixture pulls away from the sides of the pan, 1 to 2 minutes. remove the pan from the heat and pour into the bowl.
4. Add the eggs one at a time, mixing well. Beat in the cheese and bacon and mix until it gets smooth and hard. Using a pastry bag or teaspoon, place onto a baking pan. Brush the top with egg yolk and sprinkle with the remaining cheese. Re-shape each of them as round top.
5. Bake for about 30 minutes, until puffed and golden brown. Turn off the heat and keep the oven door closed for another 30 minutes to dry and cool.
.
.
私の誕生日だった事もあり、久し振りに仕事ではない、少人数の会食をうちでやりました。こういう機会は新しいフレーバーを試すのに丁度良い のでイザベルもちょこちょこと新しい物を用意しました。
パーティー用によくプレーンなシュー生地(プロフィトロール)に野菜やパンプキンクリームなどをはさんで作るのですが今回作りたかったのはスパイスや野菜、ベーコンなどを混ぜ込んだシュー生地。惣菜ケーキ(ケーク・サレ)の変形です。ワインに合う塩味な物,と思いベーコンや生ハム、チーズに胡麻など色々試して“開発”したつもりだったのですが、検索してみた所、こういうチーズをいれるものは”グジェール”という名前で当たり前に存在していました。そうだったんですね。。。。ベイキングは知らない事ばかりです。
フレーバーパレットでベイキング担当のイザベルはラズベリーとチョコレートのかわいいケーキを作ってくれました。試作品でもチョコレートにこだわるスイス人の彼女らしい完成度の高い味でした。


Happy Holidays!, originally uploaded by Reiko27.
My mission this year was salad. Basil potato salad proved to be a good combination for the tree & wreath. It made me very happy to see the star shaped vegetables on my (husband’s) family’s plates.
今年のクリスマス・ディナーはサラダを持って行くだけでした。夫の両親はあまり野菜を食べない人達なので、各自のお皿に星形の野菜がちゃんと取られているのを見て満足した私です。
ツリーとリースの作り方は至って簡単です。ポテトサラダにペストソースを混ぜ、(ソースも自作の場合は油分を控えめにします、なるべく固めのポテトサラダ方が成形しやすいです)緑色にします。ベースとなるツリーやリース型に形を作り、薄切りのきゅうりや星形の人参やペッパーを飾って行って出来上がりです。
 私の母がクリスマスに作るタルトです。顔はかなり違うのですが私も作る様になりました。レシピはこちらです。
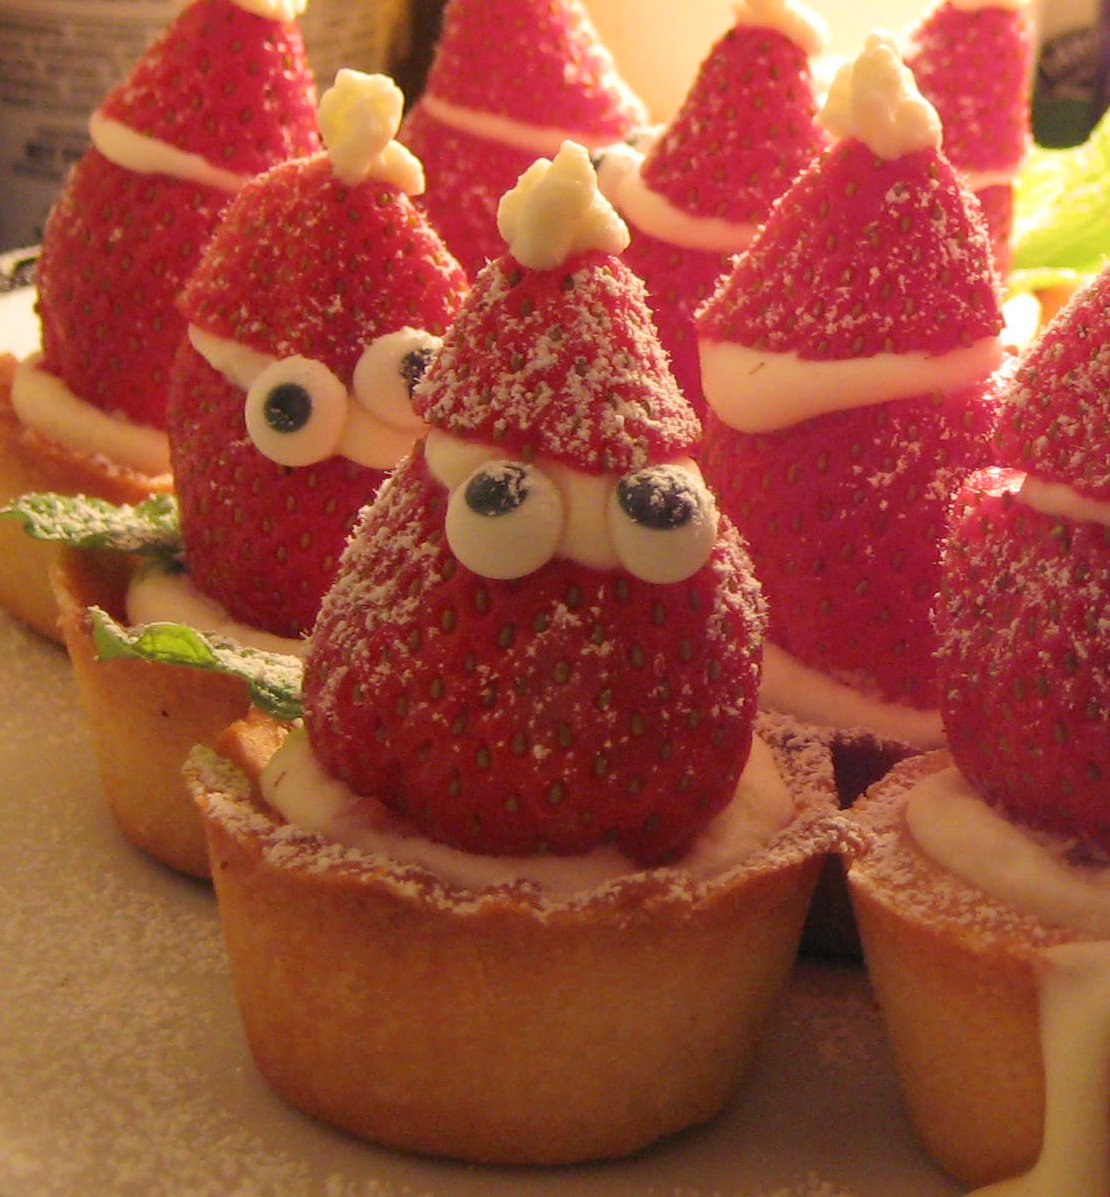
Santas are from my last year’s posting. Happy Holidays!!


